Showing posts with label linux. Show all posts

Friday, April 20, 2012

Record stream media using mplayer

I really like a radio program that goes on air on a local radio. The radio is small, so they do not have a web site and podcasts even less. But they do have an online version of the radio broadcast.

Since the program goes live at 6am every day I always missed it (yes, I am not a morning type of person). To avoid such complications I wrote a simple bash script that calls mplayer to record the streaming radio at a given time of the day. The code goes like this:

#!/bin/bash

LENGTH="65m" # lenght of the recording

mplayer -quiet -dumpstream -dumpfile RECORDED.dump \
mms://&
echo $! >~/.mplayer-dumpstream.pid
sleep $LENGTH && kill `cat ~/.mplayer-dumpstream.pid`
rm ~/.mplayer-dumpstream.pid
So when I want to listen to the show I just use the unix "at" command to run this script at a given time. For instance:
# at -f script.sh -v 6am tomorrow
That is it. By the way, you can do that for video streaming as well. Enjoy

Saturday, June 19, 2010

Practical spell checker: aspell

aspell is a practical spell checker available for Linux and Mac OS X. It is installed by default on most linux distros. You can get it in mac using MacPorts/Fink. aspell goes through your document, asking to replace words that it suspects are wrong.

I used it a few days ago to spell check a paper of mine before submitting. It has different modes, for instance a TeX mode. Here is how you call it to spell check a latex document written in english:
aspell check -l en --mode tex paper.tex

How to spell check a document in brazilian portuguese:
aspell check -l pt_br test.txt

Try it, it is very easy to use.

Sunday, January 31, 2010

Dropbox: online folder to easily sync your data across different computers

Like many users, I regularly use more than one computer: one at home (a Mac) and one at work (Linux workstation). This kind of situation creates some challenges regarding how to keep your data synchronized between the different computers/operating systems.

That's where the free online service Dropbox comes handy. It creates a local folder called Dropbox in your "home". Everything that you dump in that folder is automatically synced with the online folder, and immediately made available to all your computers. You just need to install a dropbox client in each computer, and that's it. Thanks to Dropbox, I almost don't need to use USB flash drives anymore to sync data between different computers. Sweet!

Dropbox has a cool feature: it lets you share a folder among a group of people. Let me give an example of how that can be useful. Suppose you have coworkers/collaborators and you are working together on some code, paper or data. Suppose that you are constantly updating your code/paper/data and your collaborator wants to always have the latest version of it. When you share a dropbox folder with your collaborators, every change that you or your coworker make to any file in that folder is automatically made available to all the people sharing the folder. See how the sharing feature can be useful?

Dropbox gives you a free 2 GB account. For paid accounts, they provide more space (up to 100 GB).

Link to join Dropbox (includes a tour of the features).

Changelog:
  • May 31 2010: Added "sharing" feature.

Tuesday, December 1, 2009

Recovering data points using g3data

A very nice free, (GNU GPL) application that can be used for extracting data from graphs is g3data. You can install it in ubuntu by typing:
$ sudo apt-get install g3data
or simply download it from the g3data website http://www.frantz.fi/software/g3data.php

I have used it a few times in the past on graphs of different kind and quality and always obtained good results for the extracted data points using it.
The following picture shows g3data at work on a plot:


When the data are recovered you can store them in a file and use your favorite tool to create a new plot.

Wednesday, November 11, 2009

Recovering deleted pictures from a memory card

A friend of mine recently deleted by accident around 700 pictures from a memory card in her Sony digital camera. She asked for my help and I thought that it would be an easy task to recover the pictures. I played with different programs aimed at data recovery, some of them tuned specifically for photo recovery. Here is a description of the different programs that I used and the results.

I've got several suggestions from colleagues of recovery software to try in linux and windows. I also found that this list of free data recovery programs at lifehacker was very useful.

This tutorial assumes that the memory card is formatted with the filesystem FAT16 (default filesystem in memory cards). The first thing you need to avoid is to write any data to the device where the deleted files were stored.

You should create an image of the device as soon as possible, in case anything goes wrong. In Linux that is pretty easy. Assuming that the memory card is mounted as /dev/sdb1, you need to issue the command
sudo dd if=/dev/sdb1 of=backupcard.img

I tried the following free software (ordered according to my taste): Recuva (win), recoverjpeg (linux/mac) and PhotoRec (win/linux/mac) (recoverjpeg and PhotoRec are available in Ubuntu via Synaptic). I also tried the commercial alternatives Stellar Phoenix Recovery (win) and Nucleus Kernel FAT (win). The latter two programs gave the same results as the three free programs listed above, so no need to pay for them.

The first program I tried was Recuva. It immediately recovered all the deleted files. Unfortunately most of the recovered pictures were corrupted or broken. By corrupted I mean that the pictures have one or more of the following "features":
  • Pictures split in two or more parts
  • In between a picture there is part of another photo
  • Colors changed
I would say that only 1/7 of the deleted pictures were successfully restored, and the rest had the problems specified above. I tried to fix these problems using JPEG Recovery (win), which allegedly would fix the corrupted pictures but got no success.

recoverjpeg gave the same results as Recuva: restored all the photos, but only ~1/7 of the original files were successfully recovered with no problems.

PhotoRec only recovered the ~1/7 pictures that had no problems, ignoring the other corrupted files.

My conclusion: if you use windows try Recuva. If you are a Linux user, try recoverjpeg. And please check this list of Five best free data recovery tools.

Monday, October 19, 2009

Making your linux desktop more useful (and prettier)

Here is a list of things that I implemented in my Linux desktop manager (Gnome), and made it more productive and also prettier. By prettier I mean looking more like Mac OS X. So in fact this guide gives suggestions to make your linux desktop become more like Mac OS X.

Disclaimer: Some of the suggestions are suited for Gnome, which is the desktop manager that I use. My distro is Ubuntu.Why do I pick Gnome? Well, because I don't like KDE and because Gnome looks more like Mac OS X.

First of all, you need Compiz to turn on pretty 3D effects. And in order to have compiz working you need decent drivers for your video board, with support for 3D acceleration. I suggest to install the package compizconfig-settings-manager which provides a nice interface for changing the settings of the different compiz plugins.

The compiz plugins that I find most useful are:
I like Mac's Dock, and I have something very similar to that in linux with the application AWN Manager.

Google Desktop for linux is a fantastic desktop search tool. It allows me to open the papers and documents I want incredibly fast, without needing to browse any folder. Just need to press CTRL twice and type the relevant keywords. It is the analogous of Mac's Spotlight.

For quickly opening applications, try Gnome-Do. It is the equivalent of Mac's Quicksilver. Again, no need to browse menus for the application you need. Just call gnome-do and type in the few beginning letters in the name of the program you want to launch.

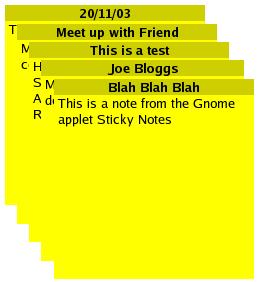
For to-do lists and reminders, try the Sticky Notes applet that comes built-in with Gnome.

Any other suggestions? Feel free to comment.

Thursday, October 15, 2009

Tutoriais sobre linux

Este post contém um material que enviei para algumas pessoas que estão iniciando no uso do linux. Pode ser útil aos usuários iniciantes.

Alguns comandos muito úteis no terminal do linux

TAB auto-completa comandos ou nomes de arquivos/diretórios
~ apelido para o caminho da tua home (exemplo: "cd ~" volta para a home)
whatis comando explica sucintamente pra que serve o comando
man comando manual do comando
whereis comando caminho onde está o programa responsável por comando
pwd mostra o caminho completo do diretório corrente

Tabelas de consulta rápida aos comandos

Printable beginner's guide to the terminal

Practical reference of linux commands

Páginas de referência (mais longas)

Guia Foca de Linux

Ubuntu pocket guide and reference (livro completo, grátis)

Linux tutorial for beginners

Alguém tem sugestões sobre bons livros para usuários iniciantes do linux/ubuntu? Escrevam nos comentários.

Saturday, October 3, 2009

Solved: Gemini PIT does not work in Ubuntu Linux (recent versions)

Some people noticed that the Gemini PIT (phase I tool) does not work well with some of the most recent versions of Ubuntu linux. What happens: you try to run PIT, but is welcomed by a blank window.

I found out that this problem happens because PIT is not compatible with the resource Compiz available in the most recent versions of linux. The goal of compiz is to make your desktop prettier, looking more like a Mac OS X. The solution is to temporarily disable compiz while you have to submit your observation proposal using PIT.

To temporarily disable compiz, there are two ways that occur to me:

1. In Gnome: System -> preferences -> appearance -> visual effects, set none.

2. Use the program Compiz-switch, which is what I did.

The same trick also works for the Observing Tool (Gemini OT) program.

Wednesday, September 30, 2009

Solucionado: Gemini PIT não funciona no Ubuntu Linux (versões mais recentes)

Algumas pessoas que estão encaminhando pedidos de tempo com o Gemini notaram que o Gemini PIT (phase I tool) não se entende bem com as versões mais recentes do Ubuntu. O que acontece: você tenta rodar o PIT, mas é agraciado com uma janela em branco.

Descobri que este problema ocorre pois o PIT é incompatível com o recurso Compiz presente nas versões mais recentes do linux, que serve pra deixar o sistema mais bonito. A solução é desativar temporariamente o compiz enquanto você tem que usar o PIT.

Pra desativar temporariamente o compiz há duas maneiras que me ocorrem:

1. No Gnome: System -> preferences -> appearance -> visual effects e botar none.

2. Usar o programa Compiz-switch, que foi o que eu fiz.
 
Locations of visitors to this page